[nuxt】Nuxt的生命周期
官网的生命周期介绍: Nuxt Lifecycle
我们结合Vue的生命周期钩子来理解。
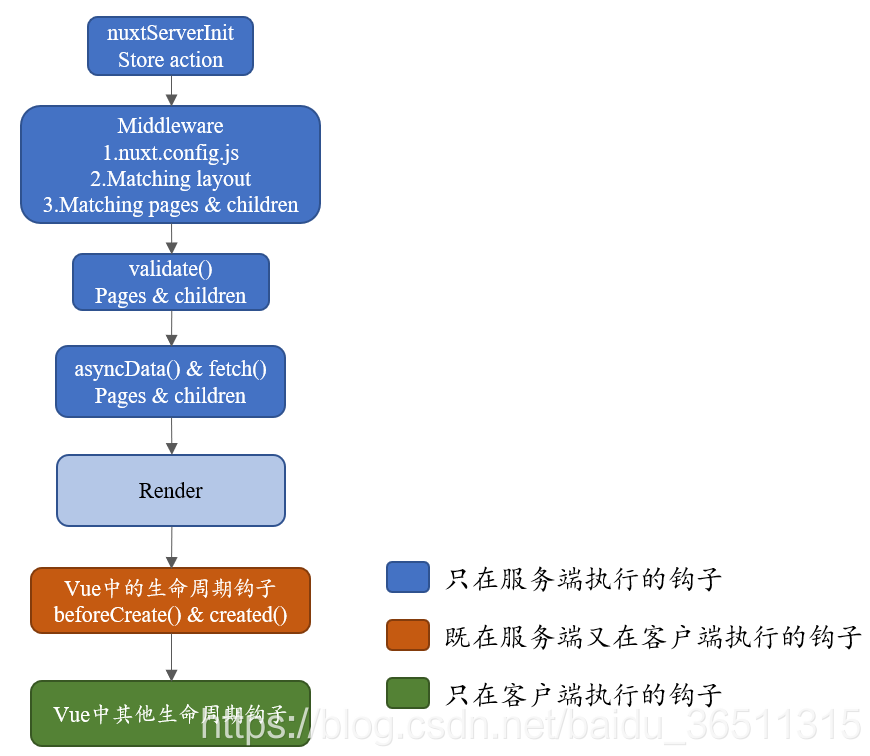
画了一张图便于理解:

- nuxtServerInit 服务端初始化
- middleware 中间件运行
- ·validate()·校验参数
- asyncData() & fetch() 异步数据处理
- Render 客户端开始渲染
1.nuxtServerInit
在s t o r e \color{FF7D00}{store}store目录下新建i n d e x . j s \color{FF7D00}{index.js}index.js,并写入以下内容:
export const actions = {
  nuxtServerInit(store, context) {
    // 可以在这里初始一些内容到store中
    console.log('nuxtServerInit!!!');
  }
};
npm run dev启动项目。
启动成功后,我们访问一下http://localhost:3000/页面。然后看服务端打印的内容:
√ Client
  Compiled successfully in 2.54s

√ Server
  Compiled successfully in 2.17s

i Waiting for file changes                                                                                                                                                                              11:12:40
i Memory usage: 171 MB (RSS: 245 MB)                                                                                                                                                                    11:12:40
i Listening on: http://localhost:3000/                                                                                                                                                                  11:12:40
nuxtServerInit!!!
这说明我们写在s t o r e / i n d e x . j s \color{FF7D00}{store/index.js}store/index.js中的n u x t S e r v e r I n i t \color{FF7D00}{nuxtServerInit}nuxtServerInit方法在页面加载时被自动调用
2.middleware
middleware的执行顺序:nuxt.config.js中配置的 -> 匹配layouts -> 匹配pages
在middleware{middleware}middleware目录下新建f i l t e r . j s \color{FF7D00}{filter.js}filter.js,并写入以下内容:
export default ({ store, route, redirect, params, query, req, res }) => {
  // context 服务端上下文
  console.log('middleware nuxt.config.js !!!');
}
在 nuxt.config.js{nuxt.config.js}nuxt.config.js中插入内容:
router: {
  middleware: 'filter'
},
注:修改了配置文件需要重启才能生效。
修改layouts{layouts}layouts目录下的d e f a u l t . v u e \color{FF7D00}{default.vue}default.vue:
<template>
  <div>
    <nuxt />
  </div>
</template>

<script>
export default {
  // middleware: 'filter' // 可指向在nuxt.config.js中配置的中间件
  middleware() {
    console.log('middleware layouts!!!');
  },
  data () {
    return {
    }
  }
}
</script>

<style scoped>

</style>
修改pages目录下的index.vue,新增内容:
...
<script>
export default {
   // middleware: 'filter' // 可指向在nuxt.config.js中配置的中间件
  middleware() {
    console.log('middleware pages!!!');
  },
}
</script>
重新请求http://localhost:3000/页面。然后看服务端打印的内容:
nuxtServerInit!!!
middleware nuxt.config.js !!!
middleware layouts!!!
middleware pages!!!
应证了前面提到的,middleware的执行顺序:
nuxt.config.js中配置的 -> 匹配layouts -> 匹配pages。
我们可以在中间件中获取服务端的上下文context,做些操作:
middleware(context) {
    // 用context进行一些操作
},
3.validate
修改pages目录下的index.vue,新增内容:
...

<script>
export default {
  ...

  // 路由发生变化时,做参数校验
  validate({params, query}) {
    // 进行一些校验操作
    console.log('validate!!!');
    return true;
  }
}
</script>重新请求http://localhost:3000/页面。然后看服务端打印的内容:
nuxtServerInit!!!
middleware nuxt.config.js !!!
middleware layouts!!!
middleware pages!!!
validate!!! 如果我们让validate()返回false,重新请求http://localhost:3000/页面:
服务端正常打印信息。
但是,客户端页面会提示所访问的页面不存在。
4.asyncData 和 fetch
页面首次加载时,异步数据的获取代码可写在这两个钩子里面(不能写在Vue的created或者mounted里面,页面获取不到)。
修改pages目录下的index.vue,新增内容:
...

<script>
export default {
  ...

  validate({params, query}) {
    // 进行一些校验操作
    console.log('validate!!!');
    return true;
  },
  asyncData(context){
    console.log('asyncData');
    return {
      a: 2000
    }
  },
  data() {
    return {
      b: 1000
    };
  },
  fetch({store}){
console.log('fetch');
  }
}
</script>
重新请求http://localhost:3000/页面。然后看服务端打印的内容:
nuxtServerInit!!!
middleware nuxt.config.js !!!
middleware layouts!!!
middleware pages!!!
validate!!!
asyncData
fetch
客户端界面,我们通过Vue Devtools查看页面的数据store:
5.beforeCreate 和 created
修改pages目录下的index.vue,新增内容:
...

<script>
export default {
  ...

  // 客户端和服务端
  beforeCreate() {
    console.log('beforeCreate');
  },
  created() {
    console.log('created');
  },
}
</script>重新请求http://localhost:3000/页面。可以看到服务端打印的内容:
nuxtServerInit!!!
middleware nuxt.config.js !!!
middleware layouts!!!
middleware pages!!!
validate!!!
asyncData
fetch
beforeCreate
created
客户端打印的内容:
beforeCreate
created
Vue中的其他生命周期钩子
修改pages目录下的index.vue,新增内容:
...

<script>
export default {
  ...

  beforeMount() {
    console.log('beforeMount');
  },
  mounted() {
    console.log('mounted');
  },
  beforeUpdate() {
    console.log('beforeUpdate');
  },
  updated() {
    console.log('updated');
  },
  beforeDestroy() {
    console.log('beforeDestroy');
  },
  destroyed() {
    console.log('destroyed');
  }
}
</script>
注: 服务端渲染不支持 activated 和 deactivate,因此Vue中的这两个生命周期钩子无效。
其他生命周期钩子仅在客户端运行。
总结,在服务端的生命周期钩子中,只能通过context去访问服务端的上下文环境,服务端中的this指向的是undefined,不存在window对象。